So you’ve got RSET – now what?
RSET is a tool that lets you explore your 3D scans like a video game, and enables you to augment your scans with all sorts of built-in assets to simulate almost anything. That means the very first step is the 3D Scan!
The 3D Scan
RSET itself does not currently produce 3D scans. You will need to capture your own scans and then load those onto your computer for use inside the RSET software. Although there are many methods to create 3D scans of real-world environments, the following are our top three methods based on budget and equipment availability:
Room-scale Scanning
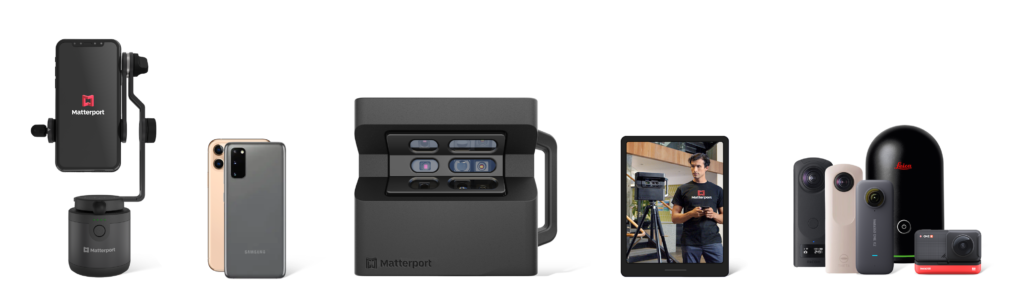
The best quality scans come from room-scale scanners. Matterport offers a variety of cameras, apps, and accessories that provide high fidelity, accurate scans of building interiors. If you opt to go for the best-of-the-best with the Matterport Pro3 camera, you’ll be able to create seamless environments comprised of interiors AND exteriors.
If you aren’t ready to pull the trigger on your own equipment but still need Matterport quality scans, get in touch with us and we’ll help connect you with a local scan professional that can help capture your environments. The Matterport MatterPak is the extra asset you’ll need to get the .obj file to load into RSET.
Pros
- Highest Fidelity and quality
- Captures large areas easily
- Able to hire someone to perform the scanning service
Cons
- Most Expensive
- Slower capture time compared to other methods
- Logistical Burden (needs iOS app, tripod, etc)
iOS LiDAR Scanning
A new force in the environment capture market is Apple’s iPhone and iPad Pro level devices. If you have an iPhone 12/13 Pro, iPhone 12/13 Pro Max, or an iPad 2020/2021 Pro, then you’ve got Apples new built-in LiDAR Scanner. The quality of the scans produced by these sensors is incredible, especially for smaller environments. There are plenty of free apps available on the app store that will let you scan and convert into a textured .obj straight from your device. We’ve had great results from the “3d Scanner App(TM)” on the app store, but there may be other apps available now so don’t be afraid to try out others that catch your eye. Remember, the desired result is to get a textured .obj file(s) to load into RSET.
Pros
- Great Quality
- Usable with free iOS apps
- Quick to capture, low logistical burden
Cons
- Requires specific “Pro” iOS device
- Large environments are more difficult to capture
Photogrammetry
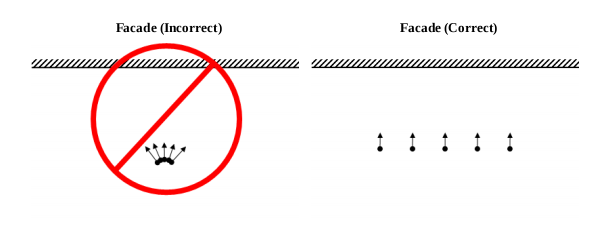
Photogrammetry ( or “Structure from Motion”) is the technique used to extract 3D information from overlapping 2D images, either still photos or frames from a video. It is by far the lowest barrier of entry from a scanning hardware perspective – all that’s required is a decent digital camera. A lot of aerial outdoor collections are performed with a digital camera slung under a drone, resulting in excellent quality, large-scale datasets. Photogrammetry has a place in the toolbox for interior scanning, but it’s main benefit is logistics and cost. Scan quality is highly dependent on how the videos or photos are captured, the amount of overlap, lighting, and overall distance from the area of interest. Photogrammetry excels at quick captures of single areas of interest, captured from a “strafing” perspective. You will not want to stand still and rotate the camera around, instead you want to capture the area of interest from as many different flat-on perspectives as possible. The following images from Agisoft illustrate best practices:

Once you have your photos/video captured, the next step is converting those stills into a 3D object. This will take some trial and error on your part, but with some time you’ll be able to get usable results from nothing more than a digital camera. We’ve experimented with a lot of different suites of software for photogrammetric conversion. Meshroom and 3DF Zephyr are great software options to start out on with smaller projects.
Pros
- Low/No Cost – just needs a camera phone
- Lowest logistical burden
- Quick capture time
Cons
- Must adhere to best practices for capture
- Difficult/impossible to do large areas without merging
- Requires separate software conversion
- NO absolute scale – scale is relative and must be scaled by hand